Subject Record
Chattel Web Application Process Flow
Web Application Process Flow
The initial "Home" page will be blank, but as you enter subjects and complete valuations, the "Home" tab will display a summary list of the "Recent Subjects" and "Recent Valuations". The Tabs across the top (see below) are the notification center with the orange bar over the "Home" tab currently. Like Maven, begin with the "Admin" Tab (red arrow) for your permissions and server links.
The first step involved the "Admin" tab to define the User permissions --- as shown below by the second graphic below followed by the explanations.
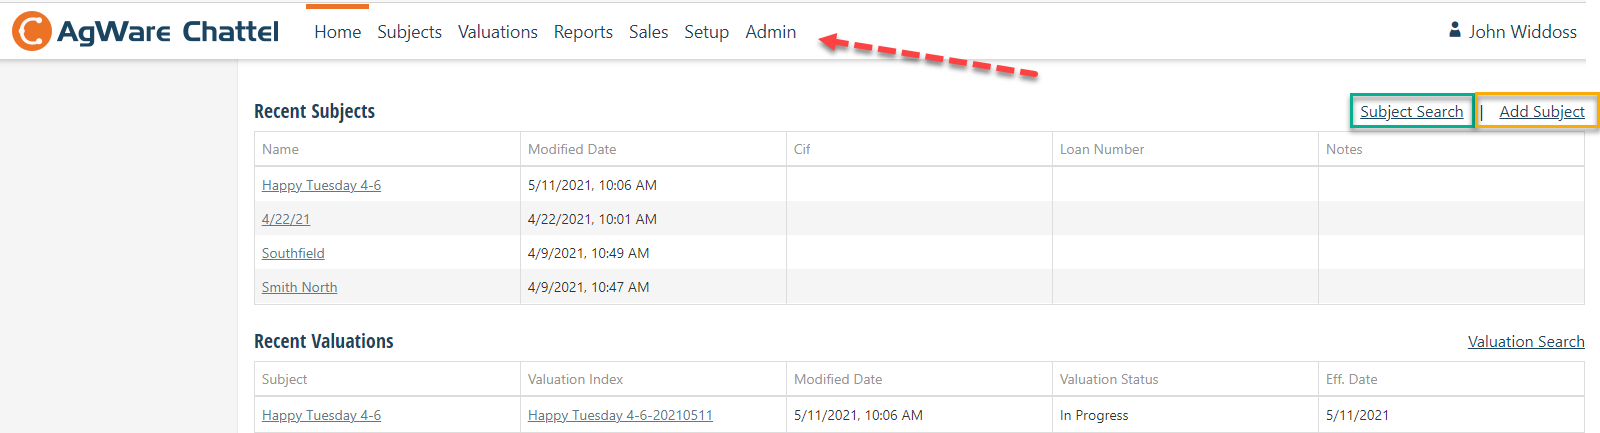
While premature at this point, users can initiate the "Add Subject" button (yellow) and move directly to a new subject entry screen, or "Subject Search" for previously entered subjects (partially completed or finished) as shown by the green box from the "Home" tab.
The activity for each Tab is:

Similar to MAVEN, the user must first build the model or dictionary of terms, prices, etc., before valuations can occur. The procedure begins at the "end tabs on the right", or addressing "Admin" and "Setup" first. The process begins with "Admin", the "Setup", and entering sale comps of similar machinery, equipment, livestock, crops, etc.
- Admin: Permissions or entitlements
- Setup: Model building
- Sales: Entering individual equipment sales (like comparable sales in DataLog)
- Subjects: Chattel list for valuation
- Valuations: Chattel valuation in one location, or one ownership
- Reports: Completed valuation report(s)
- Home: Summary Tab for Valuations in Progress or Completed
The "Home" Screen:
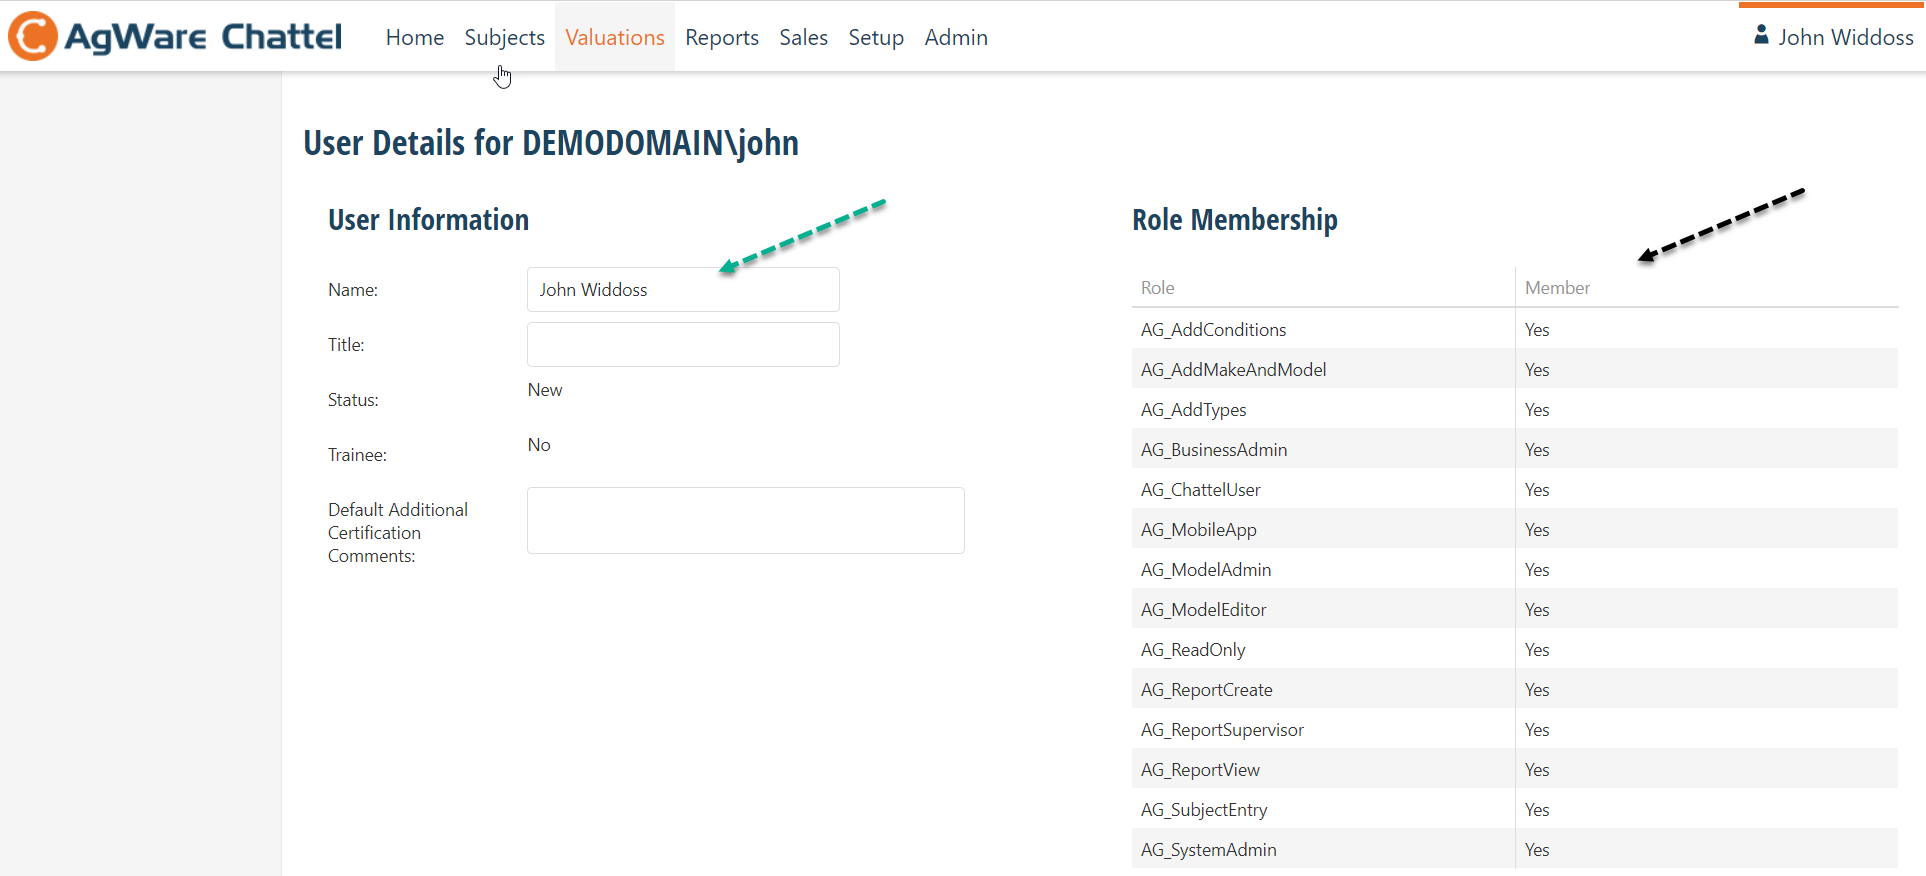
- The user must be identified by entering your name (green arrow). Enter remaining fields on the left as appropriate.
- AgWare in Piedmont, SD (605.787.7871) or via email support@uaar.net must be contacted or your program or system administer to set the "Roles" the user is entitled to use --- or "user entitlements".
This section also contains options of connecting to 3rd Party Integrators such as Iron Solutions, Tractor Zoom, etc., through separate subscriptions linked to AgWare Chattels.
1. Admin Tab

These services provide "comps or prices" for individual pieces of equipment. AgWare support will assist you in connecting to those services once you've obtain your subscription(s).
The "Mobile Data" permission is also on this Admin Screen for your phone, iPad, etc.
2. Setup Tab
Substantial entries are required on this tab ranging from what the final report will look like, identifying the make, models, and equipment types, commodities (livestock, crops, other, etc.) applied for each identified as A-O below. Note: a vague gray line sets the entries into groups:
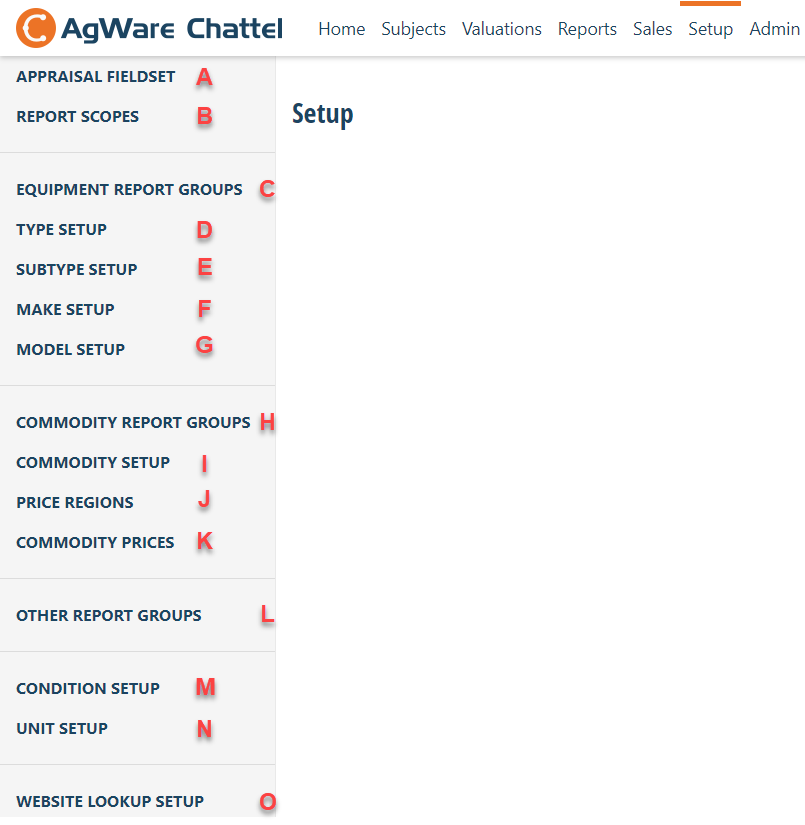
A. Appraisal Fieldset: (Organizational or Required Rule-Set) Enter the "Fieldset Name". Then enter the organizational requirements (client(s), value definitions, etc., and reporting content necessary including the valuer's prior association with the client, assets, etc., and any outside assistance used in the assignment.
B. Report Scopes: (Report Type, i.e., Valuation Report, Restricted Chattel Report, etc.) Enter the "Scope Name"; then the "Appraisal Fieldset" name. The "Appraiser Template (Record) Name" and set the "Evaluator Template" (if one used or required) --- they are found on the User's Server under Chattel Reports as C:\AgWare\Chattel\web\Reports\CustomTemplates. Any "Custom Templates" saved to the folder C:\AgWare\Chattel\web\Reports\Custom Templates will appear in the drop-down lists for Appraiser Template Name and Evaluator Template Name.
NOTE: IF you do not want to classify the equipment, machinery, or commodities by group ---- do NOT fill these unless you elect to print them in group sequence, this functionality is optional
C. Equipment Report Groups: (Tillage, Harvesting, Livestock Handling Equipment, Specialty Equipment Types (Dairy, Poultry, Swine, Processing) --- or possibly by grouping Tractors, Combines, Trucks, Vehicles, etc.).
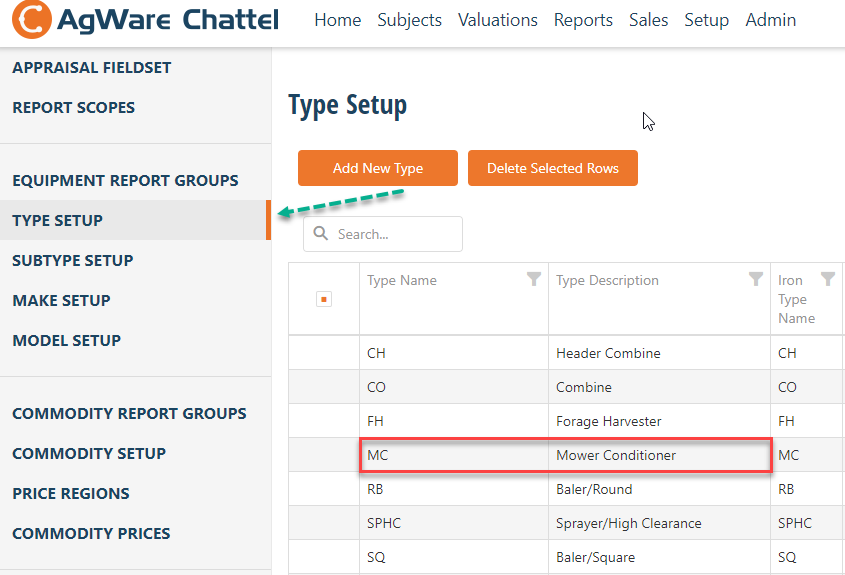
D. Type Setup: User(s) must build a list of equipment makes, models, and types. The traditional "Makes" may be parts of information from third-party providers (Iron Solutions, Tractor Zoom, etc. However, you have have some Makes that are older, specific to one geographic area, or specialization where you have to manually enter the information --- that occurs first under "Type" before proceeding with the shown order below as "Subtype Setup", "Make Setup", and Model Setup".
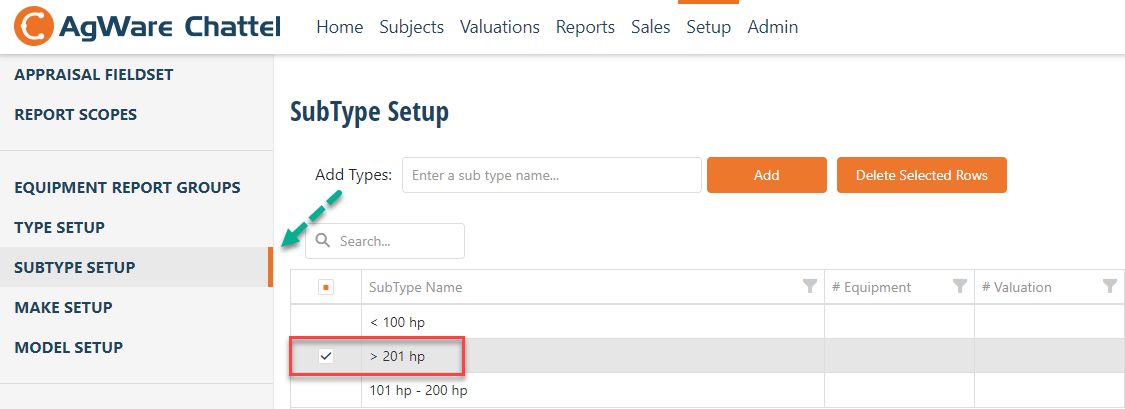
E. Subtype Setup: Some will leave this option blank. Others may want to search for a specific implement and elect to add another filter. In the example below, I've elected to show the horsepower for tractors as a "Subtype" and entered several options but "checked" >201 hp or greater than 201 horsepower.
F. Make Setup: There are four choices for "Make" Setup. A = "Choose Premade Makes" (Green A), B = "Import Iron Solutions" (Red B), "Import Tractor Zoom" (Blue C), or "Delete Selected Rows" (Black D). Others may be added later.
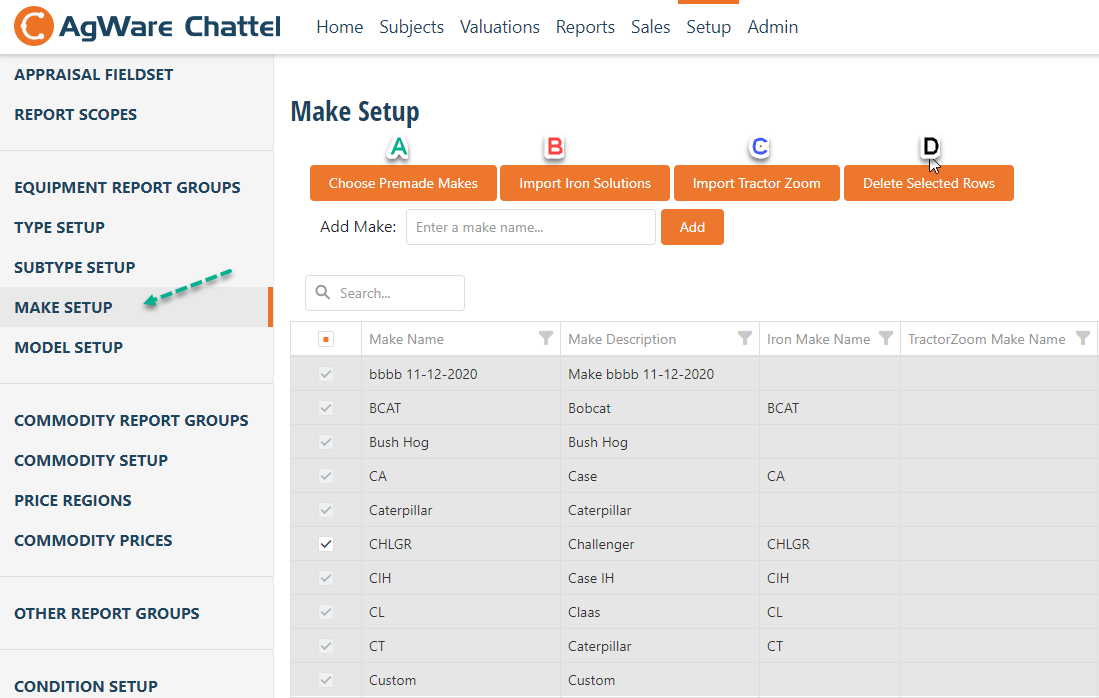
To get started with a provider like Iron Solutions or Tractor Zoom you must first purchase a user subscription (annual). The "Import Iron Solutions" button will populate the Makes and Models that they have assembled. The user may ultimately use two or more services to cover the equipment list for a subject. The object is finding sufficient sales, either from a provider or from the user's research to provide a basis for each valuation.
2a. MAKE Setup
Choice A is manual entry. Information providers will not have a "vintage car" category. So, it must the added manually by going to "TYPE" (red arrow below) FIRST and entering "vintage car". Then move back to "Make" (green arrow) and entering "A Model T", then finally to "Model" shown further below as "2-Door T, or 2-Door T4", etc.

As you can see below "Vintage Car" was added first by "Type" above. The next step is selecting vintage car from the pull-down list, then you can add "Model" as shown as 2-Door T or 2-Door T4 in the next graphic below.
G. Model Setup:
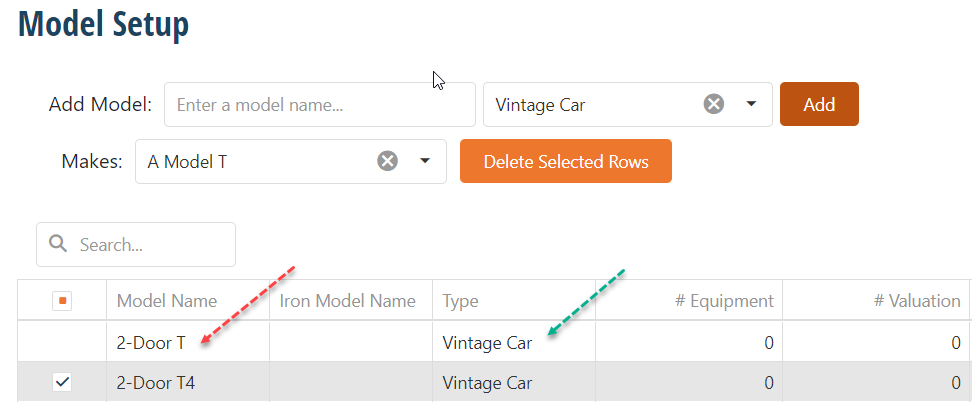
The example added a hypothetical piece of equipment as "A Model T" (starting with the letter "A" to get it at the top of the list after you hit "Add".
H. through O.: These final "Setup Tabs" are grouped together because the entry is similar to "Equipment". For each Commodity, there are groups (livestock, growing crops, stored grains, etc.) and "Price Regions" (optional) where prices may vary within a geographic area. The Chattels program requires a "group of names" and "prices" to enable valuations. That process is repeated for "Other" non-real estate assets. The user must also "standardize" the condition and units applied for each commodity (L and M below).
H. Commodity Report Groups
I. Commodity Setup
J. Price Regions
K. Commodity Prices
L. Other Report Groups
M. Condition Setup
N. Unit Setup
O. Website Lookup
3. Sales
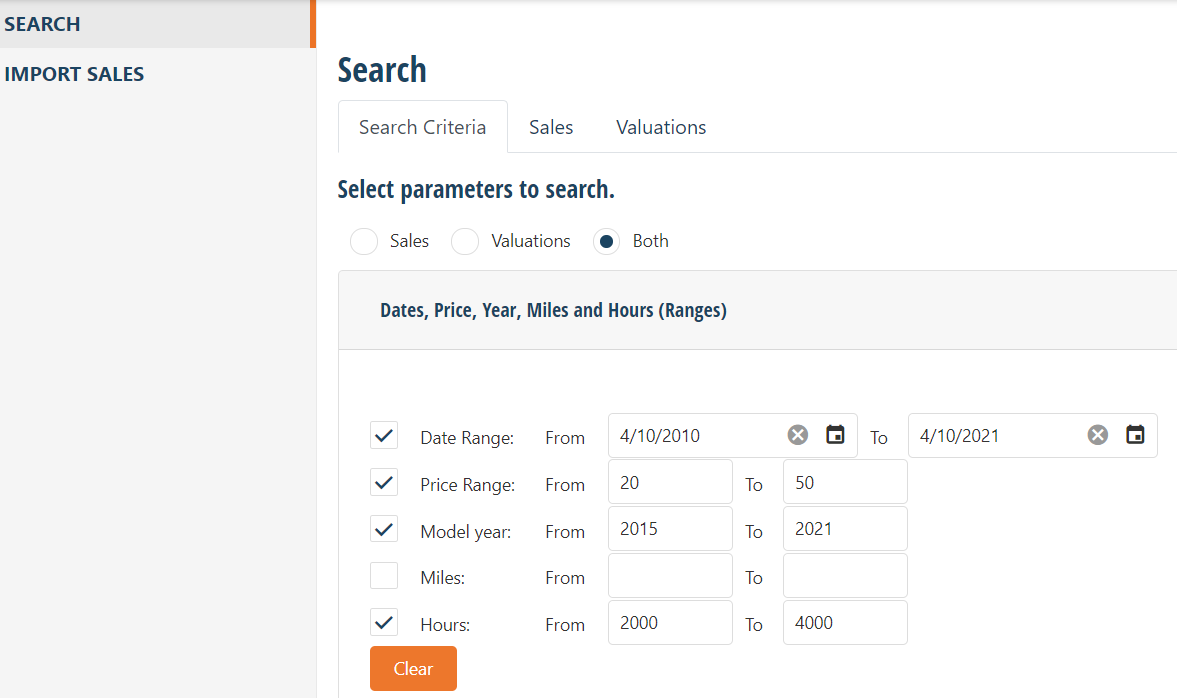
There are multiple filters that the user can use to find sales previously entered, or sorting provider's information in steps. The first step was set to scan both "sales" and "valuations". Then 4 of five filters for "date range", "price range", "model year", and "hours" in the example below.
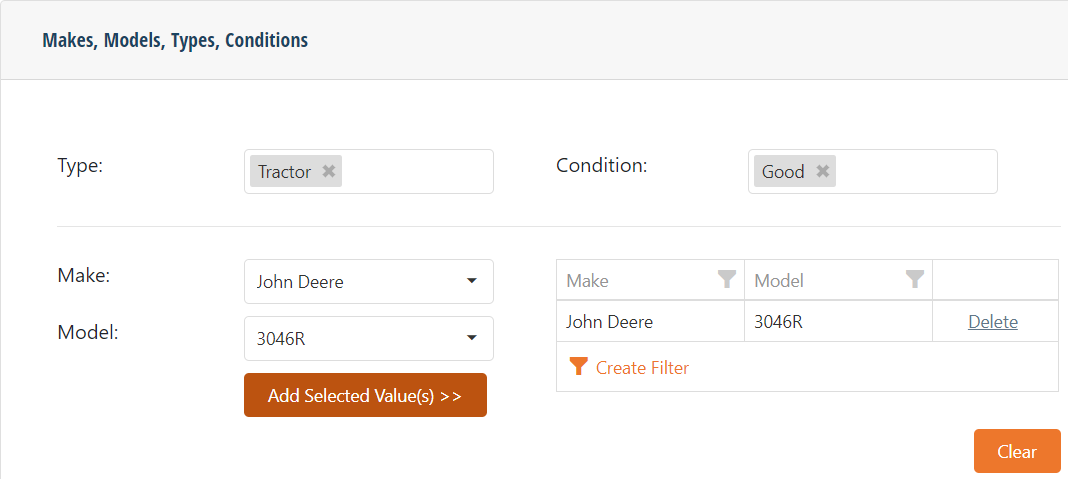
The second level of filters is for "makes", "models", "types", and "conditions". The example below identified "Tractor" in "Good" condition, "Make" as John Deere, and the "Model" number. When you hit "Create Filter (orange lettering), that selection reports all sales meeting those four criteria.
The third filter or level is LOCATION.
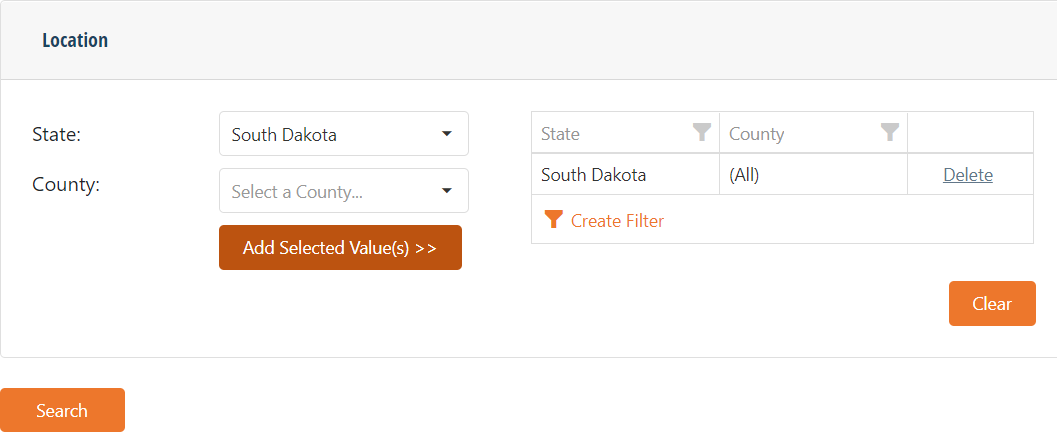
AgWare suggests widening your search to a point where sufficient current sales provide an adequate basis for your valuation. The example is set to the state only. I doubt sufficient sales in a single county of a newer model and low hours would be available. In fact, just leaving LOCATION blank may be the best option for this piece of equipment.
4. Subjects Tab
The second tab in Chattels is for entering specific "Subject" records (green arrow). Manually enter the Subject Name, pick the State and County in which it is located. The "CIF" and "LOAN #" may be used to identify a specific record.
The yellow arrow identifies three toggle options. Are "All" of the subject locations and records ready for inspection. By hitting "Ready", mobile devises can be sync with your main computer. As you take pictures in the field, they can be attached to each equipment record. Upon returning to the office and uploading your field entries, they are uploaded back into your main computer.
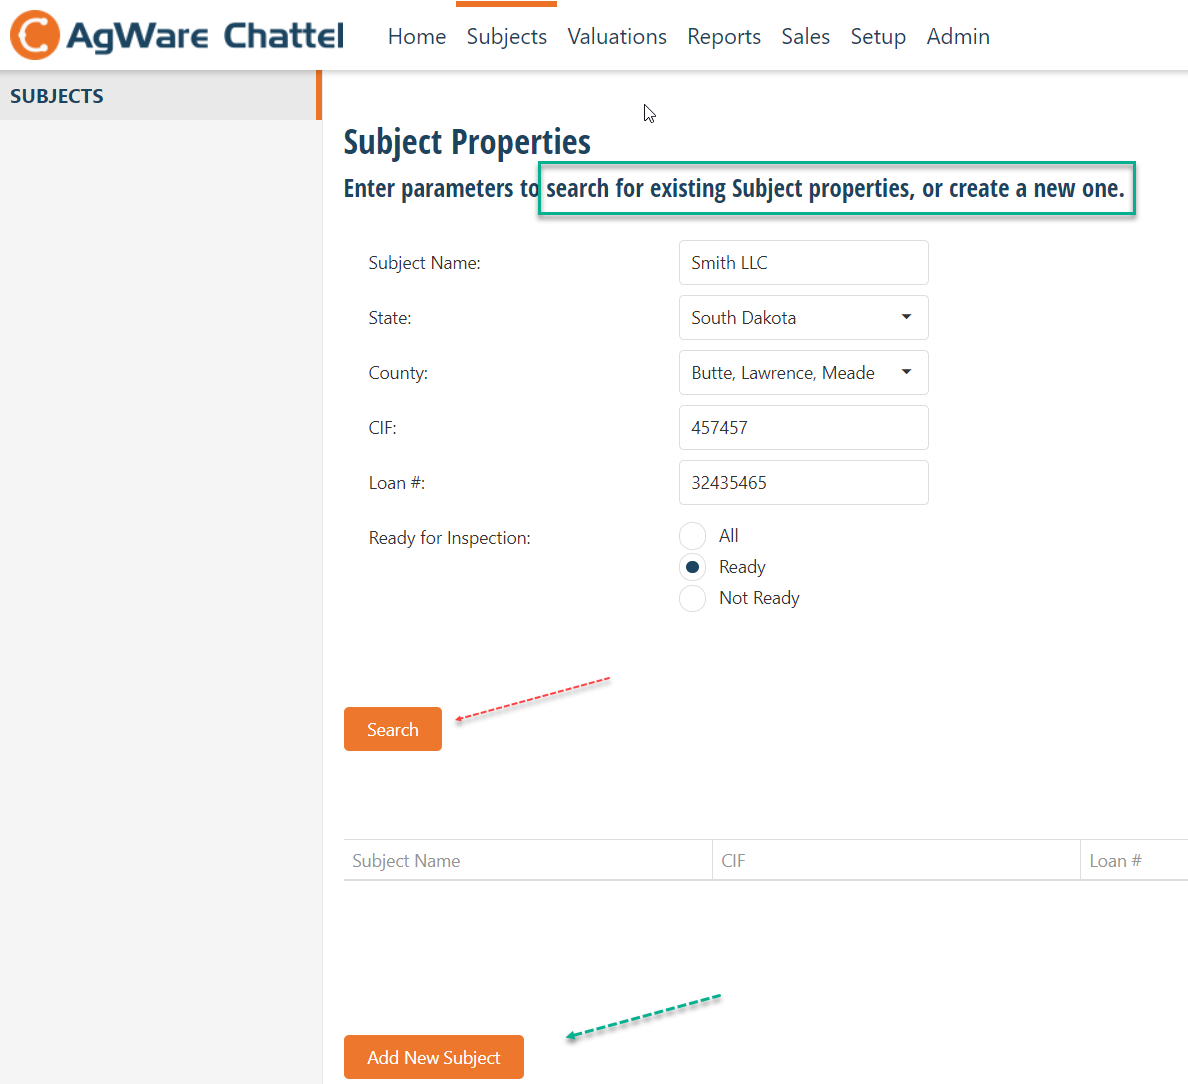
Enter the parameters for SEARCHING (red arrow) for existing "Subject" records, or to create a "new" record (green arrow).
The orange button (bottom left) can be used to enter yet another record, 3rd, 4th, 5th, etc., or multiple subjects that the user may elect to inspect during the next field-trip.
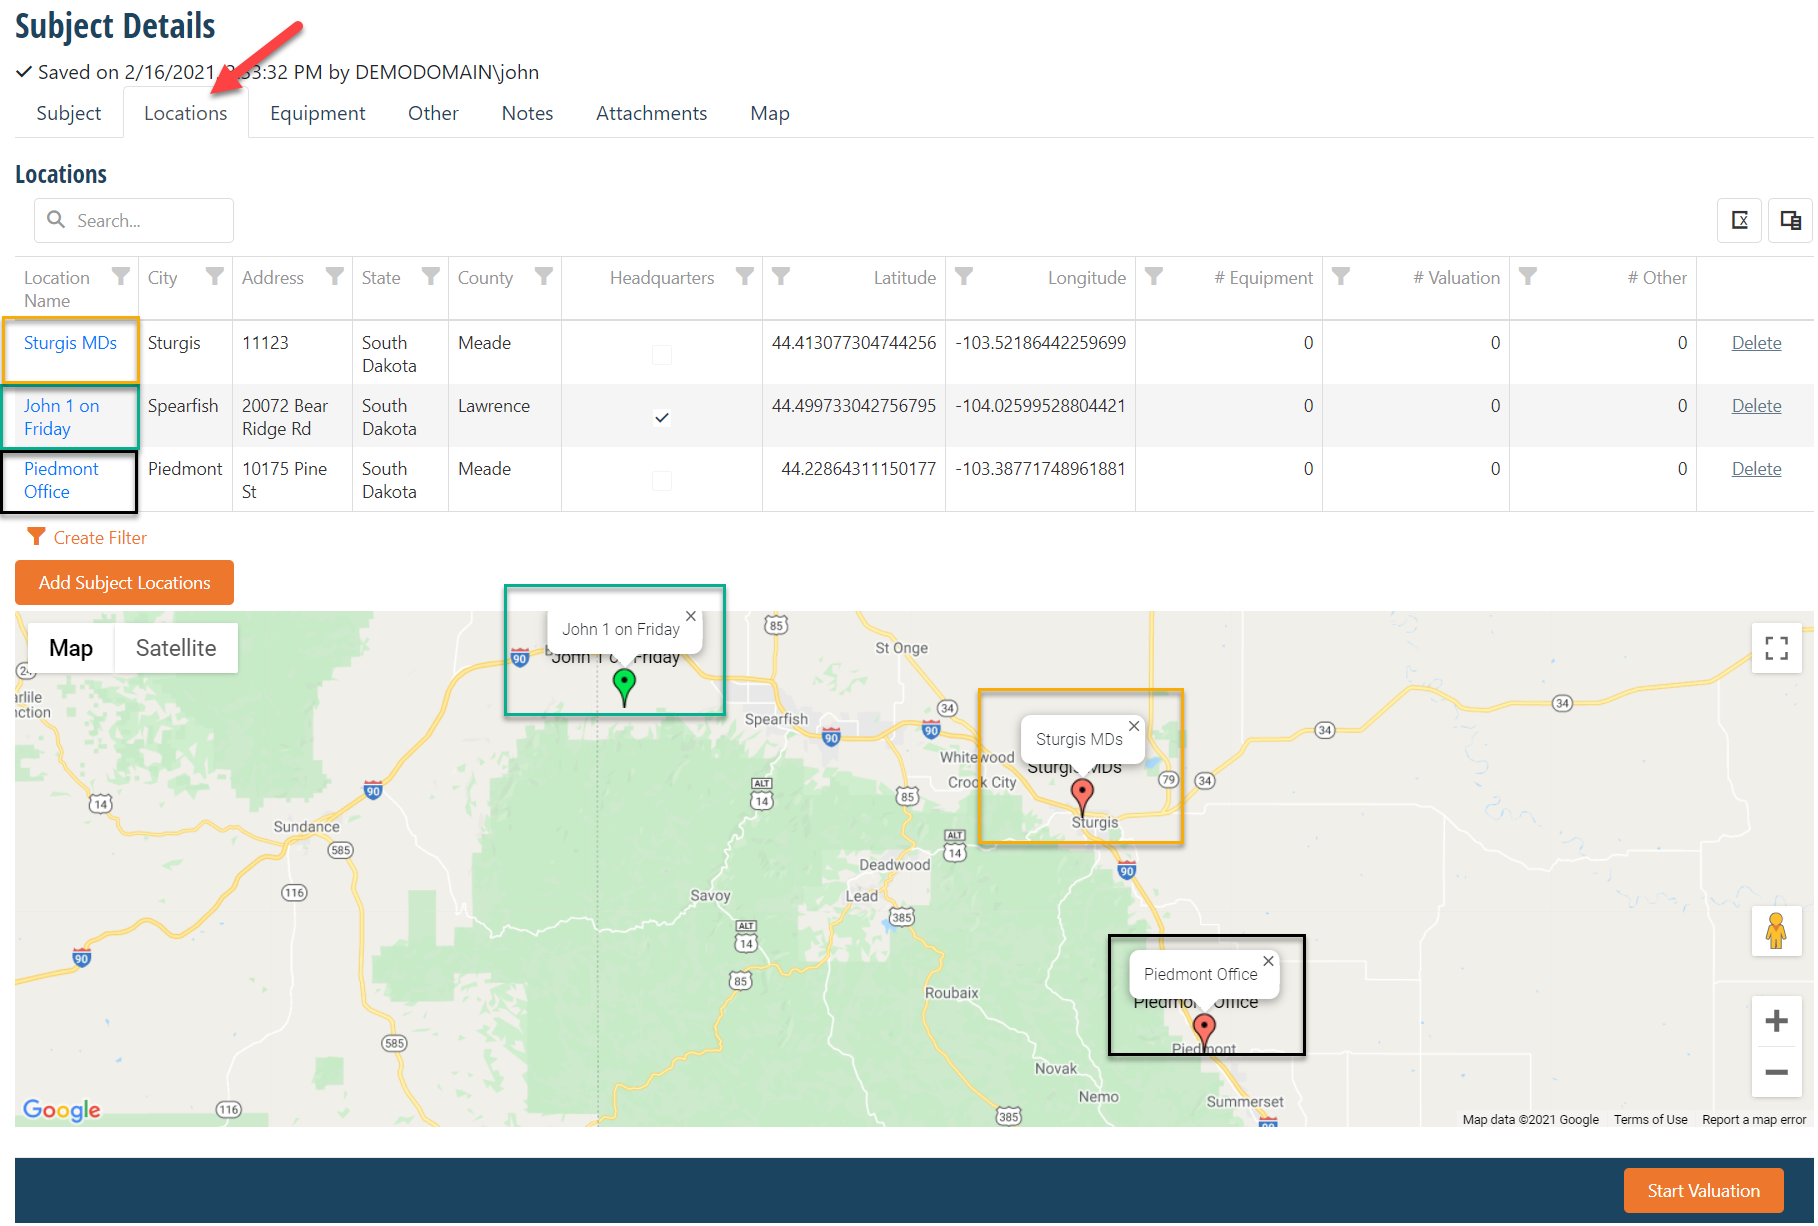
The next tab is the subject "Locations" tab for geo-coding one or more locations where the chattels are located. There are three (3) hypothetical and physically separated locations for this example that are coordinated by color. Once the grid locations are identified, go to "Add Subject Location" button (orange), then enter a "pin" for each chattel location. The lat/long will be entered from the pin reference point.
The next tab is "Equipment" where each implement can be added manually one at a time or imported from a group already in Excel™ spreadsheet. Add the "Location" of the equipment (multiple locations are possible for the same owner like the example below shows below) or select and value the equipment in just one location within multiple locations held by a single owner.
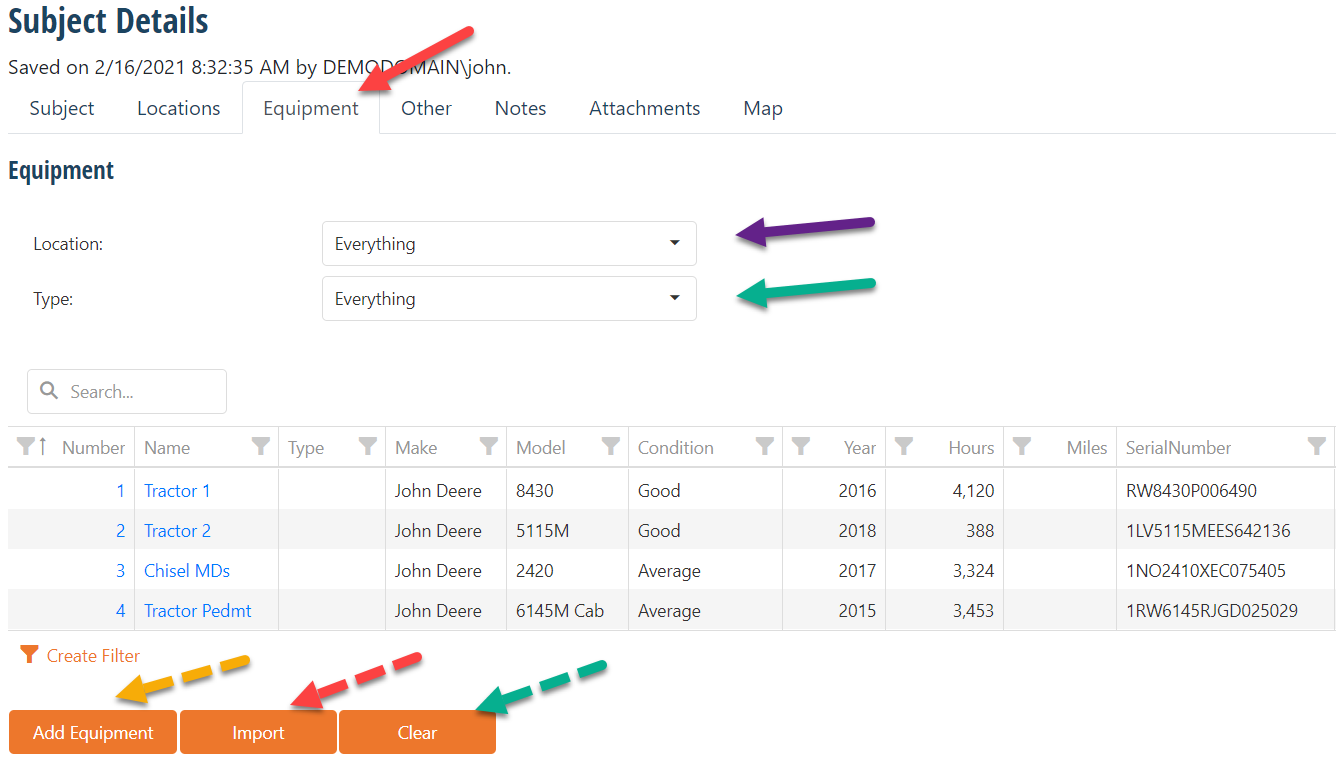
The second and direct entry option is "Add Equipment" (yellow dashed arrow bottom left). Each implement is entered one at at time --- see the next graphic below. However, the explanation for all other potential actions occurring on the visual continues.
The solid purple and green arrows show "filter" fields to synchronize the grid content for valuation. "Everything" was selected for both filters; thus, all four (4) pieces of equipment are shown in the grid.
1. The Location option can include multiple equipment locations for this ownership. Any specific location changes the grid to display chattels a single location.
2. The green arrow pointing to "Type" which will reveal a "grouping of similar chattels" --- say, "tractors" (there are three (3)). Note: the fourth entry is a chisel plow. If "tractor" is selected in the particular location, the three (3) tractors will be displayed. The reason to use the "Type" display is for linking to a "tractor website" for valuation comparisons. Simply, a tractor site would not have information for vehicles or other specialized equipment. Explanations how to enter and value things other than "tractors" will be discussed later as part of the "Model Setup".
3. The third option is hitting the "Clear" list --- likely after cloning a record or entering wrong items, then "Add Equipment" bottom where is screen is completed manually.
Note the "Serial Number" is need for the valuation process. This screen is completed again for the next implement, etc.
Also, the grid can be manually changed from cell to cell once the information is initially entered or imported.
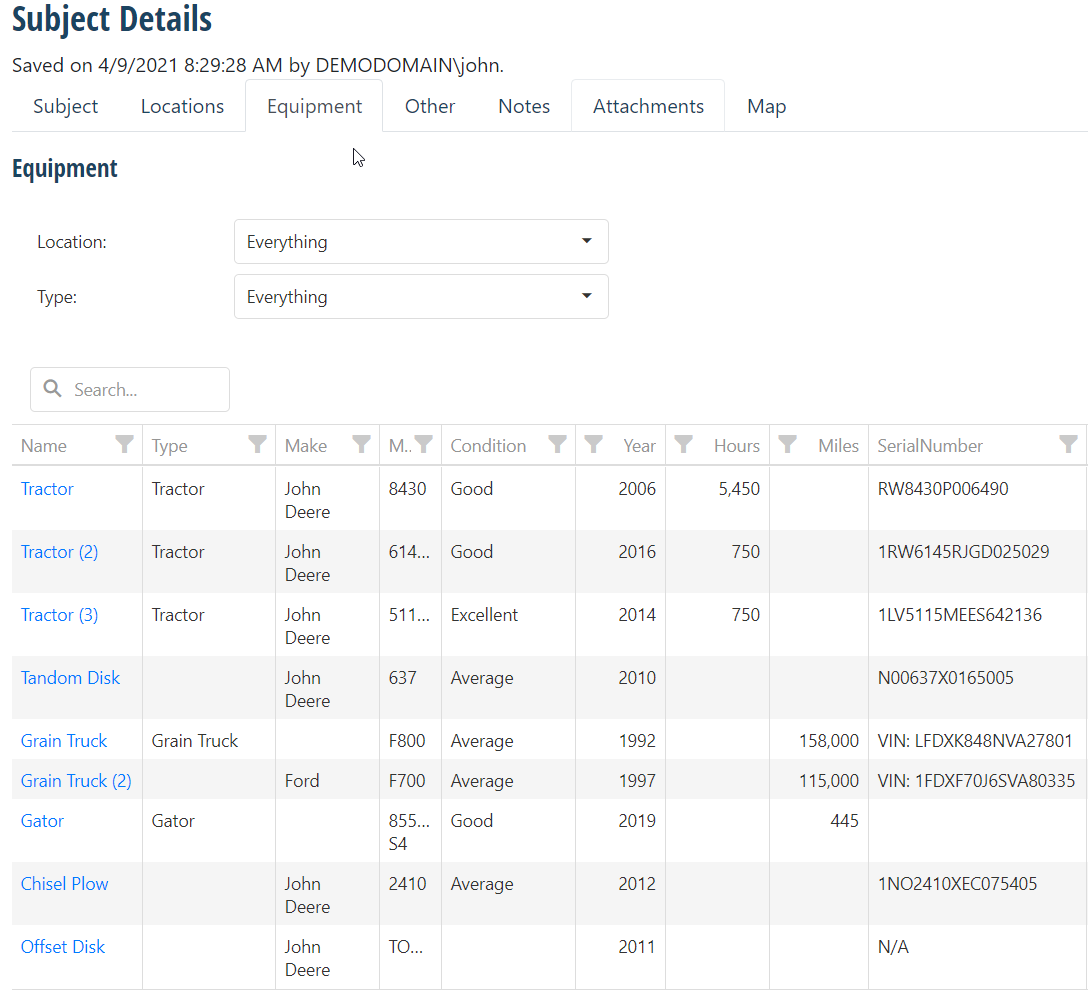
Completed Record (option)
That completes the WEB portion for now. The user can go to the field, take pictures and sync to the geo-coded locations and add field notes (once finished in the field, you'll upload the information back here to your web location and continue the valuation).
5. Valuations Tab
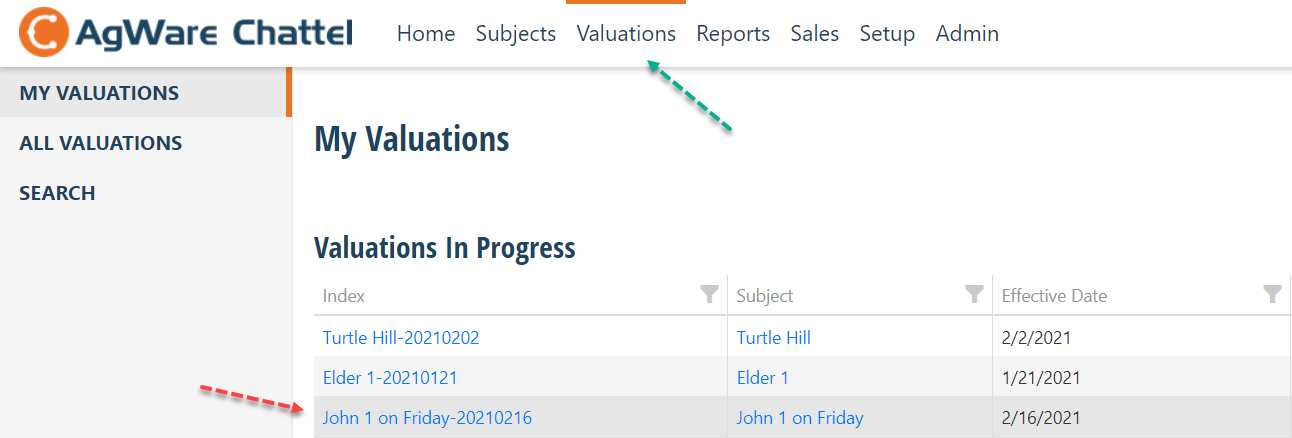
The user shows three (3) records that have been started. "John 1 on Friday-20210216 (date record created) was selected (red arrow).
6. Reports
7. Home Tab
As your Chattel program opens, the "Home" tab will always show the Subject Record Status. I this example, three (3) records have been entered. Merely clicking on one will open that record and you can proceed.
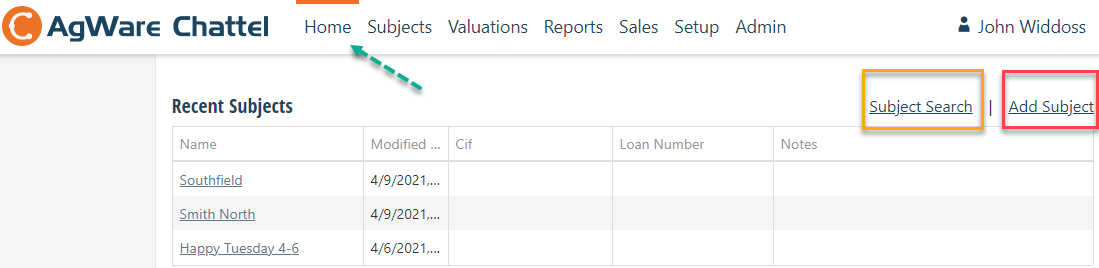
If you have NO records, the screen will be empty, but you can begin a record by hitting "Add Subject" (red box). If you know the Subject record "name" you can uses the "Subject Search" feature (yellow box).
B. Mobile Integration is available in the next "help" document